Part 2 - Simplifying Your Protein
The CBM Jmol Training Guide
Introduction
Proteins are long strands of amino acids that fold into complex 3-dimensional shapes following basic principles of chemistry.
When a Protein Structure (.pdb) File is first opened in the Jmol User Design Environment (JUDE), it will display every atom colored by element (carbon=gray, oxygen=red, nitrogen=blue) with thin lines representing covalent bonds, as shown in the image below and to the left.
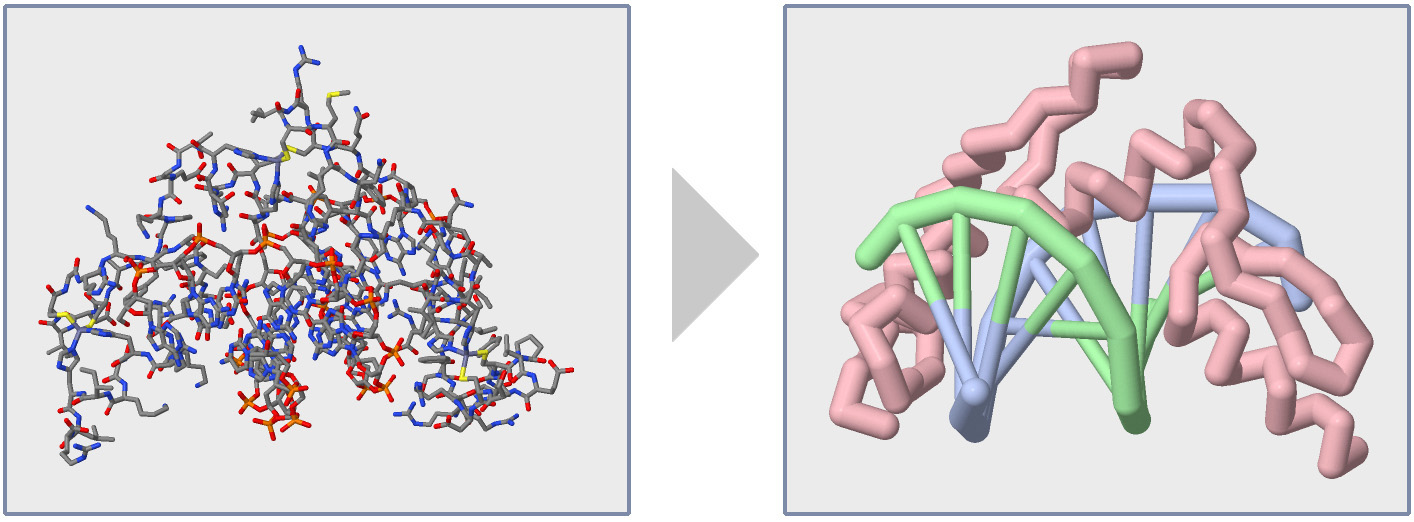
While visually impressive, this default display can also be overwhelming. It is hard to see the path of the amino acid strand(s) or locate individual amino acid sidechains that may be key to the Protein Story you want your model design to tell.
In this section of the Jmol Training Guide, you will learn how to first Explore a Protein Structure using the Display Format and Color Format commands, and then how to Focus in on the Backbone, as shown in the image above and to the right.
Note: For the remainder of this Jmol Training Guide, we will be using the Zinc Finger protein as our example protein structure (based on 1ZAA.pdb). You can load this structure in to the JUDE webpage using the PDB ID "1ZAA". This structure file includes one protein strand and two DNA strands.
Exploring the Structure
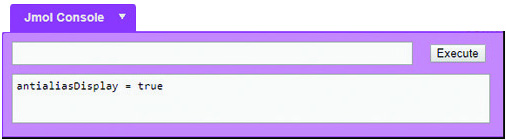
In the bottom right corner of the Jmol User Design Environment is the Jmol Console, which will be used to input text commands that can alter your Jmol display.
Once a Jmol command has been typed into the console, you can either click the "Execute" button or press the "Enter" key on your keyboard to submit the command.
Note: A Jmol Console has also been added to the bottom right corner of this web page so that you can practice any Jmol Commands being discussed without leaving the page. The Jmol commands being demonstrated will always appear as Orange Text throughout this training guide.
Display Formats
There are three main Display Formats that can be applied to a protein structure using the Jmol commands entered into the console.
-
Wireframe Format displays all of the covalent bonds in a protein structure as thin lines, and is a great way to see how atoms are connected. By default, all structures opened in the JUDE environment will initially be displayed in Wireframe Format. To apply Wireframe Format, enter the command.
wireframe
Watch This Command DemonstratedBy default, wireframe lines are very thin. But you can scale the lines up by including a percent to the end of your wireframe command.
wireframe 200%
Watch This Command DemonstratedYou can also use a number to size your wireframe lines to an exact diameter (in angstroms). Make sure to use a decimal in your number or your command will not work properly (ie: use "wireframe 1.0", not "wireframe 1").
wirefame 0.5
Watch This Command DemonstratedYou can also completely remove a display format by adding off to your wireframe command. Note that this does not permanantly delete atoms from your molecular structure file. Rather, you are just turning off any sort of visual representation of them, meaning they can be added back later.
wirefame off
Watch This Command Demonstrated -
Spacefill Format displays atoms as large spheres, and is a great way to see a protein's overall globular shape. Like Wireframe Format, you can also change the spacefill size using a percent or number, and can turn spacefill format off.
spacefill
Watch This Command Demonstratedspacefill 50%
Watch This Command Demonstratedspacefill 2.0
Watch This Command Demonstratedspacefill off
Watch This Command Demonstrated -
Backbone Format displays only the alpha carbon atom of each amino acid in a protein structure, and connects them with a line. It is a great way to see the overall fold of amino acid strands in a protein structure.
Note: In Backbone Format, all atoms except the alpha carbon atoms of each amino acid are hidden. This does not mean the atoms are deleted or no longer part of the protein structure file, but are simply not applied a Display Format.
The ability to completely hide some atoms is a very important feature of Jmol. What features of your protein you decide to show or hide will directly impact what molecular story you can tell.backbone
Watch This Command Demonstratedbackbone 200%
Watch This Command Demonstratedbackbone 1.25
Watch This Command Demonstratedbackbone off
Watch This Command Demonstrated
Multiple Display Formats can also be applied at the same time. This allows you to combine wireframe, spacefill and backbone elements into one design. Each of the three commands below will need to be submitted to the console separately, by either clicking "execute" or the "enter" key.
spacefill 0.45
wireframe 0.2
backbone 1.25
Color Formats
Color can be another great way to help you explore your protein structure. Several common color commands are described below, and more can be found at http://jmol.sourceforge.net/jscolors/.
-
Color Chains will make each protein strand (often referred to as "chains") a different color.
color chains
Watch This Command Demonstrated -
Color Structure will highlight the secondary structures in your protein. Alpha Helices are colored magenta, Beta Pleated Sheets are colored yellow, and Nucleic Acids (DNA and RNA) are colored purple.
color structure
Watch This Command Demonstrated -
Color CPK will color each atom by what element it is (carbon is gray, oxygen is red, nitrogen is blue). This is the default color scheme applied to new structures when first opened.
color cpk
Watch This Command Demonstrated -
Specific Colors can also be applied to your protein design. This command can use common color names or RGB color values.
color orange
Watch This Command Demonstratedcolor [150, 25, 225]
Watch This Command Demonstrated
Focusing on the Backbone
Once you have explored a new protein structure using the various Display Formats and Color Commands, you should have a feel for its size, number of chains, and overall shape. Having a basic feel for the protein structure you are studying will help you determine what area of the structure you want to focus on to tell your molecular story.
Focusing on a key area of a protein often involves hiding parts of the structure that do not relate to your molecular story. Up until this point, every Jmol command we have learned has impacted every atom in the molecular structure. But with the select command, you can control what subset of atoms your future Jmol commands will impact, thereby allowing you to display and color only key areas of your protein structure.
Below are a collection of example select commands that will demonstrate how to only impact a subsets of atoms in your protein structure. For each example, the color magenta command is used to draw attention to what atoms were selected.
-
Select Backbone will make all future commands only impact atoms that are part of your protein backbone.
select backbone
Watch This Command Demonstrated
color magenta -
Select Sidechain will make all future commands only impact atoms that are part of your protein's sidechains.
select sidechain
Watch This Command Demonstrated
color magenta -
Select Helix will make all future commands only impact atoms that are part of alpha helix secondary structures.
select helix
Watch This Command Demonstrated
color magenta -
Select Sheet will make all future commands only impact atoms that are part of beta pleated sheet secondary structures.
select sheet
Watch This Command Demonstrated
color magenta -
Select by Chain ID will make all future commands only impact atoms that are part of a specific chain. Each protein or nucleic acid chain in a structure file is given a unique identifier (usually a single letter), which can be used after a ":" to select that chain in Jmol.
select :C
Watch This Command Demonstrated
color magenta -
Select by Residue Number will make all future commands only impact atoms that are part of a specific amino acid or nucleic acid residue (monomer). Each amino acid or nucleic acid in a structure file is given a residue number, which can be used to select that residue in Jmol.
Note: Unlike Chain IDs, there can be more than one amino acid or nucleic acid residue with the same residue number, if there is more than one chain in the structure file. For example, in our 1zaa.pdb zinc finger file, there are three chains - one protein chain (:c) and two nucleic acid chains making up the double-stranded DNA (:a and :b). So in the example below, there are three residues that will be selected for the residue number "5", one on each of the three chains.
select 5
Watch This Command Demonstrated
color magenta -
Select by Residue Range will make all future commands only impact atoms that are part of a specific amino acid or nucleic acid residue range.
Note: Like the example above, if your molecular structure file has more than one chain, selecting a range of residues can often result in more than one section of residues selected.
select 5-15
Watch This Command Demonstrated
color magenta -
Select Atom Number will make all future commands impact only a single atom in the structure. Each atom in a structure file is given a unique atom number, which can be used to select that atom in Jmol. To differentiate atom numbers from residue numbers, a "@" symbol is added at the beginning of the atom number.
select @1124
Watch This Command Demonstrated
color magenta -
Select by Element will make all future commands impact only atoms of a specific element type (ie: carbon, nitrogen, oxygen, etc.).
select nitrogen
Watch This Command Demonstrated
color magenta -
Select by Amino Acid Type will make all future commands impact only atoms that are part of a specific amino acid type (ie: histidine, cysteine, arginine, etc.). Note that this command does not use the full amino acid names, but rather their three-letter abbreviations. Click Here for a full list of the amino acid abbreviations on page 2 of the Jmol Quick Reference Sheet.
select his
Watch This Command Demonstrated
color magenta -
Select All will make all future commands impact every atom in the structure. This is the default selection when a structure is first opened in Jmol.
select all
Watch This Command Demonstrated
color magenta
0 Atoms Selected - Each time you use the select command, the number of atoms you have selected will be displayed in the console. If you have submitted a select command that does not include any atoms, it will display "0 atoms selected". For example, our zinc finger 1zaa.pdb protein is only 87 amino acids long, so "select 100" would return the message "0 atoms selected".
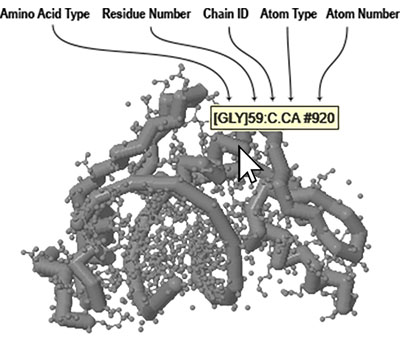
Identifying Atoms - Often you may not know the exact amino acid type, residue number, element or atom number for something you want to select. The easiest way to determine this information is to roll your mouse over the atom you want to identify. A small yellow box will pop up displaying information about the atom you are hovering over.
Boolean Operators
Even with all of the predefined selection types discussed above, you may still have trouble selecting the exact collection of atoms that you are interested in. Once you are comfortable using the basic Select command, you can begin to link together selections using Boolean Operators.
To understand how boolean operators work, imagine that you are working with two predefined selection types, helix and backbone. Some atoms in our zinc finger protein are part of helical secondary structures, some atoms are part of the protein backbone, are some atoms are included in both selection types.
-
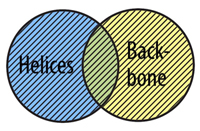
The OR Command allows you to select atoms from more than one selection type. In order for an atom to be selected using or, it does not need to fit into both selection types at the same time, just one or the other.
select helix or backbone
Watch This Command Demonstrated
color magenta -
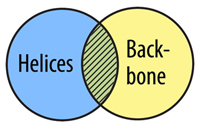
The AND Command allows you to select atoms that are in two selection types. In order for an atom to be selected using and, it must fit into both selection types at the same time, not just one or the other.
select helix and backbone
Watch This Command Demonstrated
color magenta
An Example Design
The entire goal of using Display Format, Color, and Select commands is to let you explore your protein structure and then focus in on the key region and features that will help you clearly communicate a molecular story.
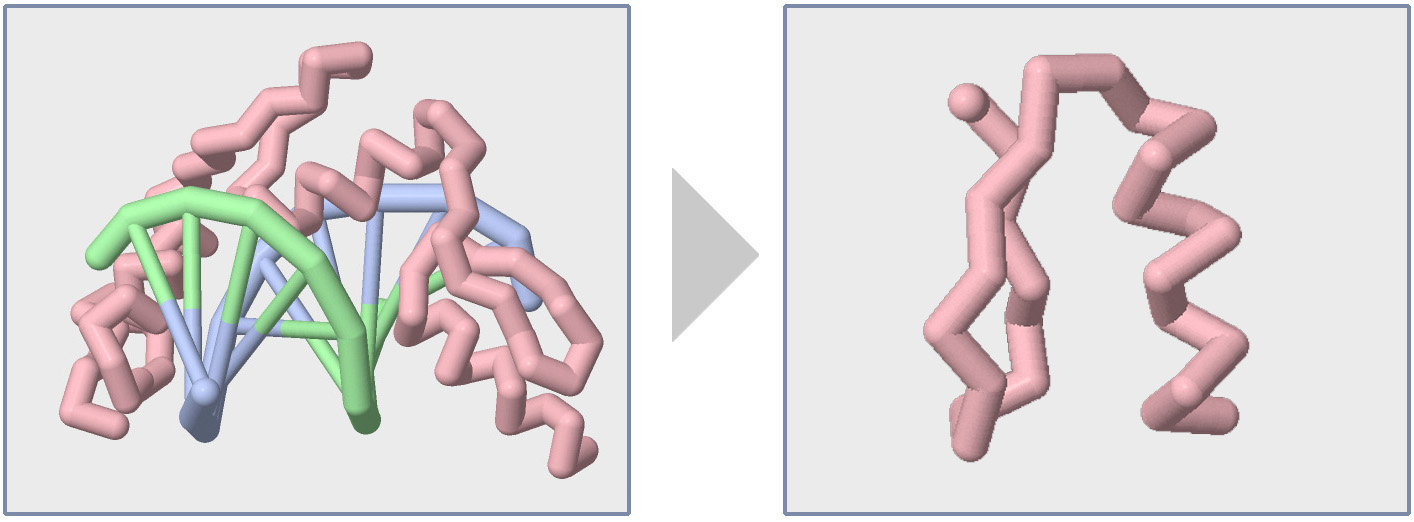
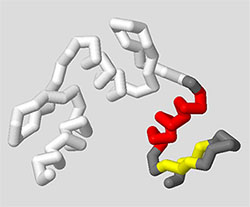
For example, imagine the molecular story you want to tell is that the 1zaa.pdb zinc finger structure is comprised of three repeating zinc finger motifs, each with a section of alpha helix and beta sheet. The commands below would produce a model that highlights only the protein chain (removing the DNA), with specific coloring that shows helices and sheets on one motif.
This type of simplified representation of the zinc finger protein is far more useful when trying to communicate that molecular story than the default display shown when 1zaa.pdb is first loaded.
select all
backbone off
wireframe off
spacefill off
select :c
backbone 1.25
color white
select :c and 1-31
color gray
select helix and 1-31
color red
select sheet and 1-31
color yellow
Conclusion
At this point, you should be able to open molecular structures in Jmol, manipulate their display formats and colors, and focus in on important regions using the select command, thereby simplifying your protein design when compared to how the structure was displayed when it was first opened.
In the next section, Adding the Details, you will learn how to add back specific key amino acid sidechains, substrates, ligands and bonds, which will further help communicate your molecular story.